It's Easier Than You Think
Ice fishing is way more accessible than most people assume. You don't need expensive gear, you don't need a snowmobile, and you don't need to be Bear Grylls. If you can drive to a lake, walk on flat ground, and sit in a chair, you can ice fish.
Your first trip will probably look like this: drive to the lake, park, walk out 50 metres, drill or chisel a hole, drop a line, sit in a chair with a hot drink, and wait for a tug. Most beginners catch their first fish within 2 hours. The hardest part isn't the fishing — it's staying warm. This guide walks you through a full day, from the night before to packing up.
One thing to note upfront: you do need a valid fishing licence to ice fish in every Canadian province and territory. There's no separate "ice fishing licence" — your regular provincial fishing licence covers it. See our ice fishing licence guide for details on each province's specific ice fishing rules.
The Night Before — What to Prepare
Check the ice conditions. This is non-negotiable safety. Call the local tackle shop or bait shop near the lake — they'll know the ice thickness and whether people are already out. Many shops post daily ice reports on Facebook or their websites. Here's the minimum safe ice thickness chart used across Canada:
Ice Thickness Safety Table: 4 inches (10 cm) of clear, solid ice → safe for walking. 6 inches (15 cm) → snowmobiles and ATVs. 8–12 inches (20–30 cm) → small vehicles. Critical: white "snow ice" is approximately half as strong as clear blue/black ice — double these minimums for snow ice. Ice near inlets, outlets, river mouths, and bridges is always thinner. When in doubt, don't go.
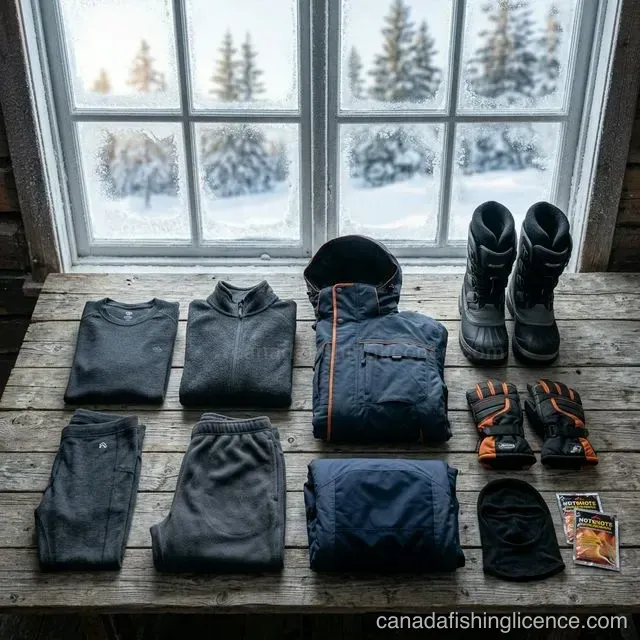
Dress in layers — not in one big jacket. The biggest beginner mistake is wearing one heavy coat and jeans. You'll sweat walking out, then freeze while sitting. Instead: thermal base layer (merino wool or synthetic, never cotton — cotton absorbs sweat and kills insulation), fleece mid layer, windproof/waterproof outer layer. Insulated waterproof boots rated to -30°C or colder are the most important single item. Cold feet end trips early. For the complete breakdown, see our dedicated ice fishing clothing guide.
Pack your gear. What you actually need for your first trip: an ice fishing rod (short, 24–28 inches — you can rent or borrow one), a small tackle box with jigs in assorted sizes and colours, live bait (minnows or wax worms — buy from the bait shop in the morning, not the night before as bait dies overnight without aeration), a bucket to sit on, and something to make a hole (hand auger, chisel, or a friend with a power auger). That's it.
Food and warmth essentials. Thermos of hot coffee/tea/hot chocolate — bring more than you think you need. Extra socks in a ziplock bag (your #1 comfort backup). Hand warmers — the disposable chemical kind cost $2 for a pack and last 8+ hours. A sandwich or energy-dense snacks (nuts, granola bars, jerky). Sunscreen and polarized sunglasses — yes, seriously. Snow reflects up to 80% of UV rays, and ice-reflected glare causes snow blindness. Polarized lenses also help you see into the hole.
Licence check. You need a valid provincial fishing licence to ice fish. Buy one online the night before — it takes 5 minutes and saves you a stop in the morning. Save the PDF to your phone AND print a backup. In Ontario, ice fishing typically allows 2 lines per angler (you must remain within 60 metres of all lines with clear line of sight). In Alberta, also 2 lines but within 30 metres. Check your province's rules.
Getting to the Lake — The Morning
Stop at the bait shop. Most bait shops near popular ice fishing lakes open early (6–7 AM). Buy live bait: minnows (best for walleye and perch — $5–$10/bucket) or wax worms/maggots (best for panfish — $3–$5/container). The bait shop owner is your best intelligence source — ask: "Where are people catching fish today?" and "What depth?" They'll tell you everything. Experienced ice anglers trade intel freely.
Find the parking area. Popular ice fishing lakes have designated winter parking areas near the access point. Follow the cars. If it's a busy lake (Lake Simcoe in Ontario, Bay of Quinte, Last Mountain Lake in Saskatchewan, Lac Saint-Pierre in Quebec), there may be dozens of vehicles and a well-worn path onto the ice. Parking on the ice itself requires 12–15 inches (30–38 cm) of solid clear ice minimum.
Walk out — carefully. Stay on well-traveled paths when possible. Avoid areas with current (inlets, outlets, bridges, river mouths) where ice is thinner. If you hear cracking, don't panic — lake ice makes noise naturally as it expands and contracts with temperature changes. This is normal thermal cracking and doesn't mean the ice is breaking. But if you see open water, slushy grey ice, or the ice feels soft and spongy underfoot, turn back immediately.
Bring ice picks (self-rescue devices). Two connected picks on a cord worn around your neck — these are self-rescue tools if you break through. They cost $5–$10 at any tackle shop and could save your life. Practice the self-rescue motion mentally: if you fall through, kick your legs to get horizontal, dig the picks into the ice ahead of you, and pull yourself up and forward. Roll away from the hole — don't stand up until you're well clear. For more safety tips, see our winter fishing tips guide.
On the Ice — Setting Up
Where to set up: For your first trip, set up near other anglers. They've already found where the fish are. 20–30 metres away is respectful — close enough to benefit from the same school of fish, far enough not to crowd them. If you ask nicely ("having any luck?"), most ice anglers will share depth and bait information. Ice fishing culture is unusually friendly — people are stuck on a lake together all day.
Drilling the hole: If you have a hand auger, start cranking. A 6-inch hole is standard for panfish; 8–10 inch for walleye and pike. It takes 1–3 minutes per hole with a sharp hand auger through 12+ inches of ice. If a friend has a power auger, it takes 10 seconds. Clear the ice shavings ("slush") from the hole with a skimmer (a slotted spoon-like tool) — buy one for $3 at the bait shop.
How many holes? Start with 2–3 holes, spaced about 2 metres apart. In Ontario, you're allowed to fish through 2 lines simultaneously while ice fishing as long as you remain within 60 metres with clear line of sight. In Alberta, also 2 lines within 30 metres. Check your province's regulations — some zones have different rules. Having a spare hole ready means you can move a line if one spot isn't producing.
Set your depth: Drop your jig to the bottom — you'll feel a slight thud when it hits. Then reel up 6–12 inches (15–30 cm). Most bottom-feeding species (walleye, perch) are caught just off the bottom. For trout, try suspended mid-water (halfway between bottom and ice). The bait shop should have told you the productive depth — use that as your starting point and adjust from there.
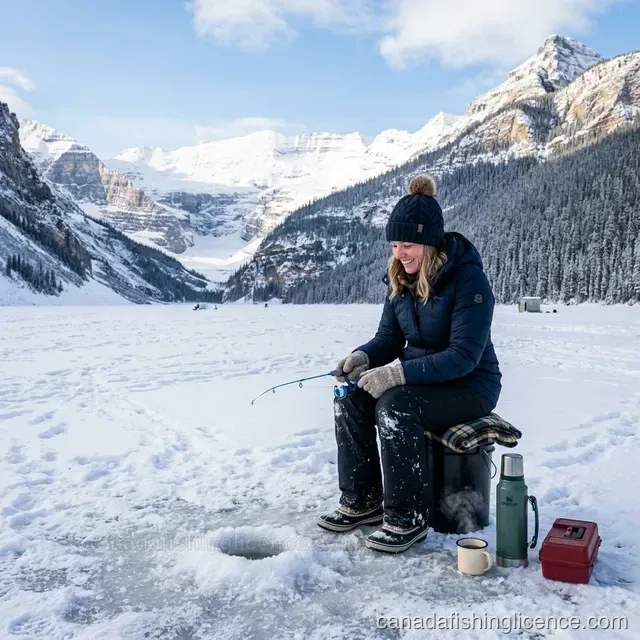
Your "chair": Flip an empty 5-gallon bucket upside down. Congratulations, you have a seat, gear storage, and a fish container all in one. Many experienced ice anglers still use buckets over fancy chairs because they're lighter, more versatile, and you can carry everything inside them onto the ice in one trip.
Fishing — What It Actually Looks and Feels Like
Here's what your first hour actually looks like:
You're sitting on a bucket, holding a short rod (24–28 inches), watching a tiny spring bobber or rod tip. Your jig is sitting 8 inches off the bottom with a piece of wax worm threaded on the hook. You jig (small up-and-down wrist movements, maybe 2–3 inches of motion) for a few minutes, then pause for 10 seconds. Nothing. You jig again. Pour some coffee from the thermos. Jig. Chat with your buddy. Jig. Watch a raven circle overhead. Jig.
Then — a subtle tap. The rod tip dips slightly, just a fraction of an inch. That's it. Ice fishing bites are gentle compared to open-water fishing. Short rod, small jig, cold sluggish fish, taut line. Set the hook with a quick upward wrist snap — not a dramatic arm swing, just a firm pop. Reel the fish up smoothly. Don't horse it — light line and a short rod mean you need to be patient.
At the hole, a glove-sized yellow perch appears, flopping in the slush. Your first ice-caught fish. It's probably not big — 8 inches, maybe 10 if you're lucky. It doesn't matter. You've caught a fish through ice while sitting outside in the Canadian winter, drinking hot chocolate, and that is objectively one of the coolest things you can do in this country.
Common catches on your first trip: Yellow perch — the #1 bread-and-butter ice fishing species. Tasty, abundant, cooperative, and they'll bite a small jig tipped with wax worm or a minnow head. Bluegill/sunfish — if you're on a panfish lake in Ontario or Manitoba. Crappie — slightly larger, schooling fish with excellent eating quality. Walleye — the prize catch, but harder for beginners. Use a minnow on a jig or a tip-up rig for best results.
If nothing's biting after 30 minutes: Change depth (try 2 feet off bottom, then mid-water). Change bait (switch jig colour — chartreuse and glow colours work in murky water, natural patterns for clear water). Move to a different hole. Ask nearby anglers what's working. Ice fishing involves patience — 30-minute dry spells are completely normal, even for experienced anglers. Fish move in schools under the ice, and when they arrive at your hole, the action can be non-stop for 20 minutes before going quiet again.
Staying Warm — The Real Challenge
Cold is the #1 reason first-timers quit early. Here's how to stay comfortable for a full day on the ice:
Feet first. This is the Golden Rule of ice fishing comfort. Invest in insulated, waterproof boots rated to -30°C or colder. Popular Canadian brands: Sorel Glacier XT, Baffin Impact, Kamik Nation Plus. Wear moisture-wicking socks (merino wool — Smartwool, Darn Tough, or Costco merino are all solid choices), never cotton. Bring a spare pair in a ziplock bag — when your feet feel damp, swap socks. This single move can save your entire trip.
Hands. Bring two pairs of gloves: thin liner gloves for handling bait and re-rigging (you need dexterity for tying knots and threading worms), and heavy insulated mitts for sitting and waiting between bites. Switch between them. Drop a hand warmer inside each heavy mitt — this makes a massive difference. Keep the heavy mitts inside your jacket between uses so they stay warm and dry.
Head and face. A balaclava or buff covers your face when the wind picks up. Wear a warm toque over it. The "40% of heat loss through the head" statistic is debatable but the practical reality is undeniable: an exposed head and face in -15°C wind feels brutal, a covered head feels manageable. Protect your ears specifically — frostbite hits ears and nose first.
The bucket trick. Put a foam sitting pad or piece of closed-cell foam on your bucket seat. Cold from the ice conducts through the plastic bucket directly into your body. The foam barrier keeps you dramatically warmer. A folded-up yoga mat (from the dollar store, $3) works perfectly.
Emergency warmth. If you start shivering that you can't stop with movement, don't tough it out — walk briskly for 5 minutes, do jumping jacks, or head to the car. Hypothermia creeps up slowly and impairs judgment. If your fingers lose dexterity and you can't tie a knot, it's time for a warm-up break. There's no bravery award for getting frostbite.
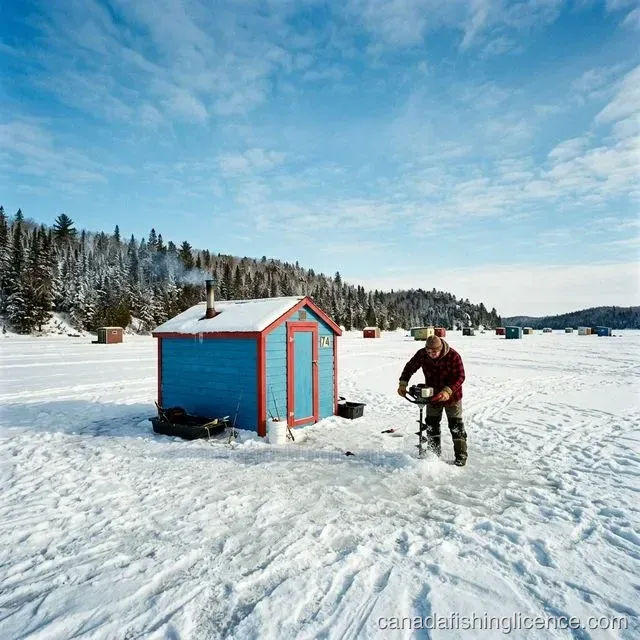
Ice huts and shelters: You don't need one for your first trip, but if you want protection from wind, a pop-up ice shelter ($100–$200) makes a massive comfort difference. Or you can rent a heated hut at many popular lakes ($50–$100/day) — some come with chairs, propane heaters, holes already drilled, and even tables for your snacks. Great for a first experience. If you leave a shelter on the ice for more than 24 hours in Ontario, it must be registered (free, online at ontario.ca/icefishing) with your Outdoors Card number displayed in 2.5-inch characters. In Alberta, shelters left overnight need your WIN (Wildlife Identification Number) or name and phone number displayed.
Ice Hut Removal Deadlines — Don't Get Fined
If you rent or own an ice fishing hut, mandatory removal deadlines still matter. Leaving a hut on the ice past the deadline — or after ice breakup, whichever comes first — is an offense under provincial public lands legislation, and fines can be substantial.
Ontario Ice Hut Removal Dates (2026): March 1 — FMZ 17 (Lake Erie) and FMZ 20 (Lake Ontario). March 15 — FMZ 14, 16 (Lake Simcoe), 18, 19, and southern FMZ 12. March 31 — FMZ 9, 10, 11, 15, and northern FMZ 12.
Alberta Shelter Removal Dates (2026): March 15 — Fisheries Management Area PP1 (national parks). March 31 — all other areas, or earlier if directed by a fishery officer due to early breakup.
Most other provinces have similar deadlines. The key rule everywhere: if the ice looks unsafe, remove your hut immediately regardless of the posted deadline. You're responsible for getting it off the water. A hut that falls through the ice pollutes the lake — styrofoam insulation breaks into thousands of microplastic pieces. Some provinces are starting to require eco-friendly hut materials specifically because of this issue.
For our full hut regulation tool including province-specific rules, see the Ice Hut Checker.
When to Call It a Day
A typical ice fishing day runs 4–6 hours for beginners. There's no shame in going home early — especially on your first trip. Good reasons to pack up:
You're cold and can't warm up. Safety first. Driving home while shivering and uncomfortable is no fun. A 3-hour trip where you catch fish and enjoy yourself beats a 6-hour endurance test. Most experienced anglers bring a change of warm, dry clothes in the car for the drive home.
The bite window closed. Fish are often most active in the first 2–3 hours after sunrise and late afternoon before sunset. The midday lull is real — many experienced anglers break for lunch in the car or at a nearby restaurant and come back for the "evening bite" in a separate session.
Weather turns. If wind picks up significantly, visibility drops (blowing snow), or temperature drops beyond what your gear can handle, pack up. Ice fishing in a whiteout is genuinely dangerous — you can lose your sense of direction on a featureless frozen lake. Mark your path with sticks or a GPS pin before heading out.
Packing up: Reel in your lines, pack your gear into the bucket, collect ALL garbage — including cut bait, line clippings, coffee cups, and worm containers. Leave nothing on the ice. Some lakes check for debris in spring when ice melts and communities track offenders. Pour hot water in your holes to melt the rim and make them visible to snowmobilers and kids exploring the lake, or mark with a branch if near a trail. Walk the same route you came out on.
The drive home: Crank the heat, swap into dry socks, talk about the fish you caught (and the bigger ones that got away), and start planning next time. Because there will be a next time. Almost everyone who tries ice fishing says the same thing: "That was way better than I expected."
Budget Breakdown — Your First Trip Under $75
Here's a realistic cost breakdown for a first-time ice fishing trip, assuming you own winter clothes and borrow major gear:
Must-buy: Provincial fishing licence ($10–$30 depending on province; often free for kids under 16 — check age requirements). Live bait ($5–$10). Ice picks ($5–$10). Hand warmers ($2–$4). Skimmer ($3–$5). Total: $25–$59.
If renting gear: Rod, auger, and tackle rental from a local shop ($20–$40/day). This is a great option for testing the waters (literally) before investing. Many shops near popular lakes like Simcoe, Bay of Quinte, or Pigeon Lake offer all-inclusive rental packages.
If renting a heated hut: $50–$100/day for a guided or outfitter hut experience. Often includes holes pre-drilled, heater, chairs, and sometimes even bait. This is the most comfortable way to try ice fishing for the first time — zero gear investment, zero setup, maximum comfort.
If buying your own minimal setup: A basic ice fishing rod ($15–$30), hand auger ($50–$80), small tackle box with assorted jigs ($10–$15), bucket ($5), foam pad ($3). Total all-in: $83–$133 — and this gear lasts for years.
Either way, ice fishing is one of the most affordable winter activities in Canada. Compare that to a day of downhill skiing ($80–$150 for a lift ticket alone) or snowmobiling ($100–$200 rental). For more on licence costs specifically, see our Cost by Province page.